Homework 2
This homework assignment was about learning the basics of JavaScript application development. Building off the skills from homework 2, we wrote a web application in JavaScript while using HTML, CSS, and Bootstrap for the page layout.
- You can find a description of this project here
- Demo located here
- The repository that contains this code can be found here
- https://bitbucket.org/devonsmith/cs460-project-repository.git
Step 1: Setup the environment
The first step for this project was adding additional directories to the assignment repository for this class.
mkdir HW2
cd HW2
mkdir js
mkdir css
Then I needed to create a new feature branch for this homework assignment on the git repository. I also need to checkout that branch so I could edit the code separate from my homework 1 work.
git checkout -b hw2
This command created a new branch and checked it out all in one step. With the new branch created, I was able to begin making the files for this code branch.
touch index.html
touch css/style.css
git add *
git commit -m "Initial code for HW2."
git push origin hw2
That’s a good starting point for my page. I began by placing my JavaScript code at the end of my body tag in the HTML, and eventually moved it to a specific .js file.
Step 2: Think of a project and design it
I’ve been working on all of the assignments at approximately the same time. I get the initial bit of code roughed out for all of my projects, and then refine and finalize the assignments over time. In Homework 3 we’re implementing a project from CS260: Data Structures in C# instead of in Java, and for this project I decided to do the same type of conversion. I’m going to implement Homework 3 in JavaScript.
My project for Homework 3 is implementing a stack-based calculator that uses postfix a.k.a. reverse polish notation. This is a typical project for a data structures class and it should allow me to learn some of the ins and outs of the JavaScript type system. The user interface and user help will be written in HTML, and the calculator logic will be written in Java.
Step 3: Wireframe Creation
The first part of my application design phase was to create a wireframe to act as the basic layout for my application and will guide my development. I know that I’m going to use HTML, CSS, Bootstrap, Javascript, JQuery, and Popper.js since they’re all in my toolkit for this class, so I designed my project to be done with those libraries and frameworks.
For my design I used the free software Pencil Project by Evolus Co. Ltd. This tool allows you to create great application wire frames and it is open source. You can get it here. Here’s the design I came up with:
Here are the wireframes:
Normal Operation
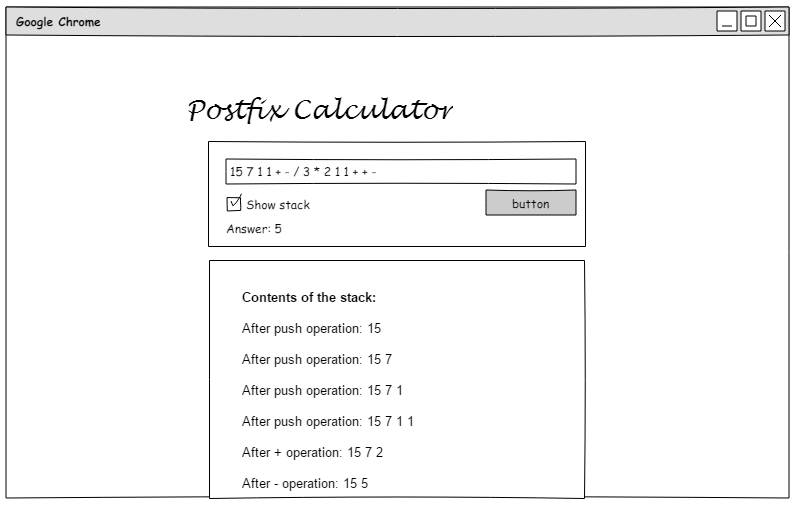
Without “Show stack” checked
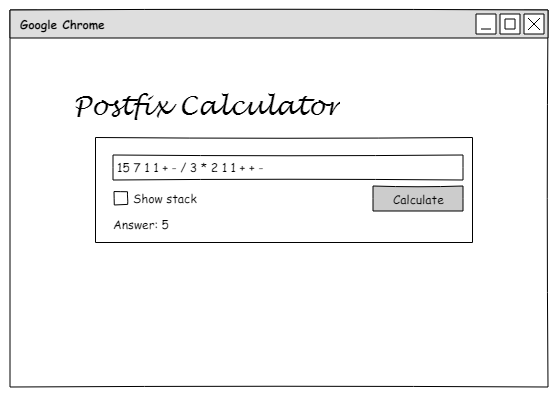
Input Error
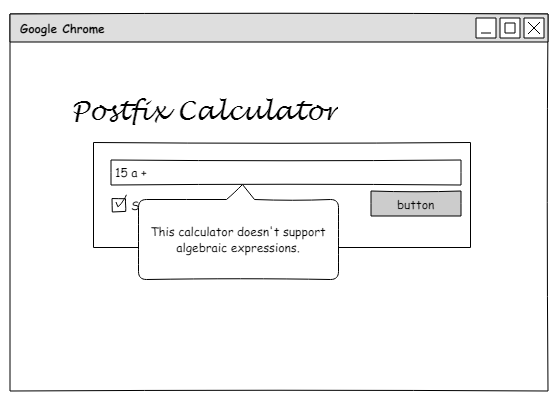
Step 4: Creating the Working Page
The first step after the design phase was to create a basic web page that would act as the user interface for the application. I began by creating the HTML and CSS layout of the page.
<!DOCTYPE html>
<html>
<head>
<link rel='stylesheet' href='https://maxcdn.bootstrapcdn.com/bootstrap/3.3.7/css/bootstrap.min.css'>
<link rel='stylesheet' href='css/style.css'>
<title>Online Postfix Calculator</title>
</head>
<body>
<!-- Title row for the calculator -->
<div class='row'>
<div class='col-sm-12'>
<h1 class='huge-text'>Postfix Calculator</h1>
</div>
</div>
<!-- end of title row -->
<!-- row for the calculator form -->
<div class='row'>
<div class='col-sm-3'>
</div>
<!-- div containing the form -->
<div class='col-sm-6 calc-form'>
<p class='text-right help-button'>
<a href='#' data-toggle='modal' data-target='#modalHelp'>
<span class='glyphicon glyphicon-question-sign'></span>
</a>
</p>
<div class='form'>
<p>Postfix calculator:</p>
<!-- test input for the postfix expression -->
<input type='text' id='user-input' class='form-control'
onkeyup='validate(this)' onkeypress="if(event.keyCode==13)calculate();">
<div id='instructions' style='visibility: hidden;'></div>
<!-- button for calculating -->
<div class='button-row checkbox'>
<label><input id='showStack' type='checkbox' value='' onclick='checkState()'>Show stack</label>
<span class='button-mover'>
<button class='btn btn-primary' type='submit' onclick='calculate()'>Calculate</button>
</span>
</div>
<!-- output field for solutions and error messages -->
<div id='output'></div>
</div>
</div>
<div class='col-sm-3'>
</div>
</div>
<!-- row for printing the contents of the stack after each operating -->
<div class='row'>
<div class='col-sm-3'>
</div>
<!-- column for output -->
<div id='outputbox' class='col-sm-6'>
<div id='trace'></div>
</div>
<div class='col-sm-3'>
</div>
</div>
<!-- end of page -->
<!-- scripts at the end of the body to limit load time -->
<script src='https://code.jquery.com/jquery-3.2.1.slim.min.js'
integrity=
'sha384-KJ3o2DKtIkvYIK3UENzmM7KCkRr/rE9/Qpg6aAZGJwFDMVNA/GpGFF93hXpG5KkN'
crossorigin="anonymous"></script>
<script>
window.jQuery || document.write("<script src='js/jquery.min.js'><\/script>")
</script>
<script
src='https://maxcdn.bootstrapcdn.com/bootstrap/3.3.7/js/bootstrap.min.js'>
</script>
<!-- IE10 viewport hack for Surface/desktop Windows 8 bug -->
<script src="js/ie10-viewport-bug-workaround.js"></script>
<!-- popper for inputs that don't pass validation -->
<script src="js/popper.min.js"></script>
</body>
</html>
CSS
To get the page looking the way I wanted it, I needed to add some custom CSS. This included choosing a cursive font to use in the page layout. I chose “Lobster” from Google Web Fonts, and included it in my CSS file named style.css.
/* import the title font */
@import url('https://fonts.googleapis.com/css?family=Lobster');
Then I created the CSS to get the page looking the way I wanted. The CSS was adjusted throughout the project as I created new code and refined the page’s appearance.
body {
    background-color: #4A1058;
    padding: 5rem;
}

h1{
    font-family: 'Lobster', cursive;
    color: #fff;
}

#stack-list{
    list-style: none;
}

.huge-text{
    font-size: 8em;
}

.calc-form{
    margin-top: 5rem;
    background-color: #fff;
    border-radius: 10px;
    padding: 1rem 1rem;
}

.output{
    margin-top: 5rem;
    background-color: #fff;
    border-radius: 10px;
    padding: 2rem;
}

.button-row{
    margin-top: 1rem;
}

.red-text {
    color: #f00
}

#instructions {
    position: absolute;
    background: #FFC107;
    color: black;
    width: 400px;
    border-radius: 0 0 1rem 1rem;
    box-shadow: 0px 0px 2px rgba(0,0,0,0.5);
    padding: 10px;
    text-align: left;
    z-index: 100;
}

.help-button{
    font-size: 2rem;
    color: #4A1058;
    margin: 0;
}

.form{
    padding: 1rem 1rem;
}

.modal-dialog{
    margin-top: 10rem;
}

.btn{
    float: right;
}

.img-left{
    float: left;
}
Calculate Function
After the main parts of the page were built, I wrote the JavaScript code that would run the application, beginning with the calculator function.
// process the expression
function calculate(){
    // input for the calculator
    // good input for testing: 15 7 1 1 + - / 3 * 2 1 1 + + -
    var string = $("#user-input").val();
    // trim the white space off the ends of the string then create
    // an array split on the spaces.
    var expression = string.trim().split(" ");
    var stack = [];

    // a string for outputting error messages
    var errorMessage = "";
    // start by making the output box for the stack trace styled.
    var trace = $("#trace");
    var list; // a placeholder for the list of stack states.
    if($("#showStack").is(":checked") == true){
        trace.html("<p><strong>Contents of the stack:</strong></p><ul id='stack-list'></ul>");
        list = $("#stack-list");
        $('#outputbox').addClass('output');
    }
    else {
        trace.empty();
        $("#outputbox").removeClass("output");
    }

    // loop through the items in the input and process them.
    for (var i in expression){
        // if the item is a valid number push it onto the stack.
        // Checks for and operand and validates it as a number.
        if (/(?:\d*\.)?\d+/.test(expression[i]) && isNaN(expression[i]) == false){
            var stackElements = "";
            stack.push(expression[i]);
            if($("#showStack").is(":checked") == true){
                for (var i in stack){
                    stackElements += stack[i] + ' ';
                }
                list.append("<li>After push operation: "
                                + stackElements
                                + "</li>");
            }

        }
        // otherwise it's an operator and needs to be processed.
        // An operation can only be performed if there are two or more items on the stack.
        else if (stack.length > 1 && /[-+*\/]{1}/.test(expression[i])) {
            // variables for non-comutative operations.
            var a = 0;
            var b = 0;
            // select a case based on the operator
            switch(expression[i]){
                // Explicitly convert items to numbers to prevent string operations.
                // Addition is commutative
                case '+':
                    stack.push(Number(stack.pop()) + Number(stack.pop()));
                    break;
                // Subtraction is not commutative
                case '-':
                    b = Number(stack.pop());
                    a = Number(stack.pop());
                    stack.push(a-b);
                    break;
                // Multiplication is commutative
                case '*':
                    stack.push(Number(stack.pop())*Number(stack.pop()));
                    break;
                // division is not commutative
                case '/':
                    b = Number(stack.pop());
                    a = Number(stack.pop());
                    // check for divide by zero
                    if (b == 0){
                        errorMessage = "<span class='red-text'>"
                                        + "<span class='glyphicon glyphicon-exclamation-sign'></span> "
                                        + "Input error: Cannot divide by zero!"
                                        + "</span>";
                        $("#output").html(errorMessage);
                        return;
                    }
                    stack.push(a / b);
                    break;
                default:
                    break;
            }
            if($("#showStack").is(":checked") == true){
                // create an ouput string for the stack elements.
                var outputString = "";
                for (var j in stack){
                    outputString += stack[j] + ' ';
                }
                // place the stack information into the trace.
                list.append("<li>After "
                            + expression[i]
                            + " operation: "
                            + outputString
                            +"</li>");
            }
        }
        // the input from the user created an invalid state.
        // not enough items in the stack to perform an operation.
        else {
            errorMessage = "<span class='red-text'>"
                            + "<span class='glyphicon glyphicon-exclamation-sign'></span> "
                            + "An error has occurred: Please check your expression."
                            + "</span>";
            $("#output").html(errorMessage);
            $("#trace").empty();
            $("#outputbox").removeClass("output");
            return;
        }
    }
    if(stack.length == 1){
        $("#output").html("Answer: " + stack.pop());
    }
    // There was more than one item left in the stack.
    else {

        errorMessage = "<span class='red-text'>"
        + "<span class='glyphicon glyphicon-exclamation-sign'></span> "
        + "An error has occurred: Please check your expression."
        + "</span>";
        $("#output").html(errorMessage);
    }

}
Input Validation Function
Once I had written code for the calculator itself, I wrote the code for input validation on the calculator’s text box. I created a validate() method that was fired onKeyUp.
// will validate the user's input field.
function validate(referenceElement){
    if (referenceElement.value.search(/[a-zA-Z,]/) > -1){
        var instructions = "<p>You appear to have made a mistake!</p>"
                         + "<p>Please remember the following:</p>"
                         + "<ol><li>You cannot use letters</li>"
                         + "<li>You must use <a href='https://en.wikipedia.org/wiki/Reverse_Polish_notation'>RPN</a></li>"
                         + "<li>Do not include commas in large numbers</li></ol>";
        $("#instructions").html(instructions);
        $("#instructions").css("visibility", "visible");
    }
    else {
        $("#instructions").empty();
        $("#instructions").css("visibility", "hidden");
    }
}
This code creates the popper dynamically and can be altered to provide more validation checking as needed.
User Friendly Check Box
Then I implemented a checkbox that allows the user to choose whether or not to view the contents of the stack as the application is being run. It also checks to see if the user has unchecked the checkbox and clears the stack printout accordingly.
// checks the status of the show stack checkbox
function checkState(){
    if($("#showStack").is(":checked") == false){
        $("#trace").empty();
        $("#outputbox").removeClass("output");

    }
}
Adding Some Help
With core application up and running, I added the instructions and about information in a help menu accessed by clicking on a question mark in the top right of the calculator body. This opens a modal menu that provides instructions for calculator use and information about the calculator itself. For this I used the modal classes from Bootstrap.
<!-- Modal Help -->
<div class='modal fade' id='modalHelp' role='dialog'>
<div class='modal-dialog'>
<!-- Modal content-->
<div class='modal-content'>
<div class='modal-header'>
<button type='button' class="close" data-dismiss="modal">×</button>
</div>
<div class='modal-body'>
<ul class='nav nav-pills'>
<li class='active'><a data-toggle='pill' href='#Instructions'>Instructions</a></li>
<li><a data-toggle='pill' href='#Technologies'>Technologies</a></li>
<li><a data-toggle='pill' href='#About'>About</a></li>
</ul>
<!-- Application help container -->
<div class='tab-content'>
<!-- general calculator instructions -->
<div id='Instructions' class='tab-pane fade in active'>
<h3>Instructions</h3>
<p>
This is a reverse Polish notation, a.k.a. postfix,
calculator. Postfix is a mathematical notation in
which the operators follow the operands.
This calculator will perform the following operations:
</p>
<ul>
<li>Addition (+)</li>
<li>Subtraction (-)</li>
<li>Multiplication (*)</li>
<li>Division (/)</li>
</ul>
<p>
Postfix notation does not require parentheses in
mathematical expressions. This calculator can process
mathematical strings using only numbers along with
+, - , *, and / symbols.
</p>
<p>
A valid input will have integer or floating point numbers
and mathematical operators separated by spaces
in postfix form.
</p>
<h4>Example</h4>
<p>
The following is an example of an expression postfix notation.
This example comes from Wikipedia.
</p>
<p>
The expression ((15 / (7 - (1 + 1))) * 3) - (2 + (1 + 1))
can be expressed with postfix notation as
15 7 1 1 + - / 3 * 2 1 1 + + -
</p>
<p>
This type of notation was commonly used in calculators because
it was simple to implement using a basic stack. This
project attempts to replicate that behavior using JavaScript.
To see how the calculator is using the stack to solve a postfix
expression, check "Show stack."
</p>
</div>
<!-- summary of technologies used -->
<div id='Technologies' class='tab-pane fade'>
<h3>Technologies</h3>
<h4>HTML 5</h4>
<p>This page uses HTML 5 for the main application body.</p>
<h4>Bootstrap</h4>
<p>
Bootstrap is toolkit for developing applications with HTML, CSS,
and JavaScript which allows for the quick development of web
applications without the need to implement all the fundamental
UI elements. It provides a number of classes and JavaScript
elements used in this page.
</p>
<h4>JavaScript</h4>
<p>
The logic of this application is built on JavaScript. The
project allowed me to familiarize myself
with JavaScript and the common libraries used for developing
rich web applications.
</p>
<h4>JQuery</h4>
<p>
JQuery is a JavaScript library that provides a number of selectors
and HTML document traversal mechanisms
which can be used to manipulate elements in an HTML document.
</p>
<h4>Popper.js</h4>
<p>
Popper.js is a small popup and tooltip library that allows for the
easy creation of tooltips and popups for web applications.
</p>
<h4>Glyphicons</h4>
<p>
Glyphicons is a collection of monochromatic icons. These are included
in Bootstrap 3 and also available
<a href='http://glyphicons.com/'>here</a>.
</p>
</div>
<!-- About software -->
<div id='About' class='tab-pane fade'>
<h3>About</h3>
<p>Author: Devon Smith</p>
<p>Created for CS460 at Western Oregon University, Fall 2017.</p>
<P>
You can find the project description
<a href='http://www.wou.edu/~morses/classes/cs46x/assignments/HW2.html'>here</a>.
</P>
</div>
</div>
</div>
</div>
</div>
</div>
The Fully Functional Page
This is an example of the fully functional web page in the various states during error checking.
Step 5: Merging Back to Master
Now that the application was tested and ready to be merged, I used git to merge the information into master branch of my repository.
git add *
git commit -m "final code cleanup"
git push origin hw2
git checkout master
git merge hw2
git push origin master